

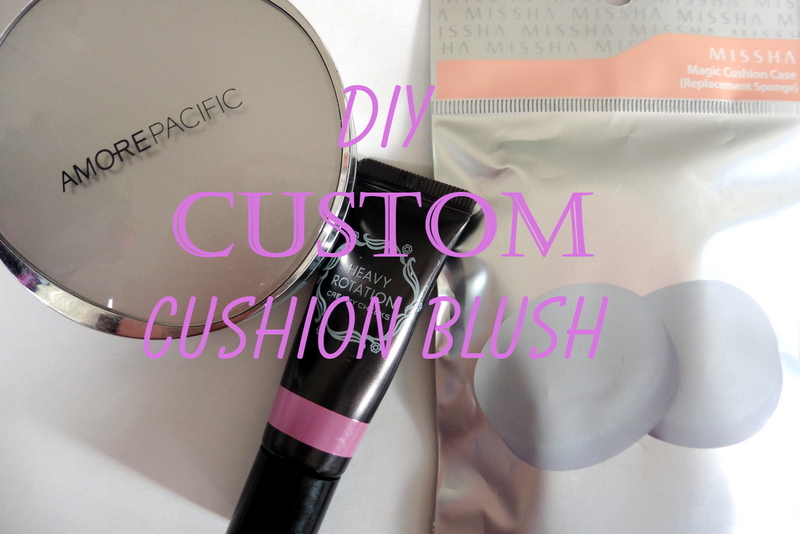
 Emboldened by my DIY cushion compact experience, I decided to try making a cushion blush (a la IOPE Air Cushion Blusher). Unfortunately, as far as I know, there aren’t any premade mini-cushion compacts designed for DIY-ing. (Missha, A’Pieu, Memebox, you listening?)
So I improvised and used a regular cleaned-out cushion compact. Luckily, my AmorePacific cushion just ran dry, so I tossed the cushion sponge and washed and dried the empty plastic holder.
You’ll need:
- Empty, clean, and dry cushion holder
- Refill cushion sponge (I used Missha’s, which come in a two-pack)
- Liquid blush
- Small spoon or spatula (like the ones that come with skincare products)
I used Kiss Me Heavy Rotation Creamy Cheeks in 02 Cutie Pink, a creamy liquid blush in a tiny squeeze tube. Renee passed this on to me because it didn’t work for her. The shade is a matte candy pastel pink and is CRAZY PIGMENTED, making it quite annoying to use. I only use a pinhead’s worth at a time to avoid looking like a baby clown. (The instructions say to use a 3mm-diameter circle for both cheeks.) This was the perfect candidate for a cushion because it requires a thin application and maximum blendability.
 It gives a sweet babydoll look; with its white base, it’s definitely not a natural-looking blush. On my fair, warm-toned skin, it initially looks like a cool-toned baby pink but eventually settles/oxidizes into a warm-leaning baby pink. By the end of the day, it has faded but is still visible.
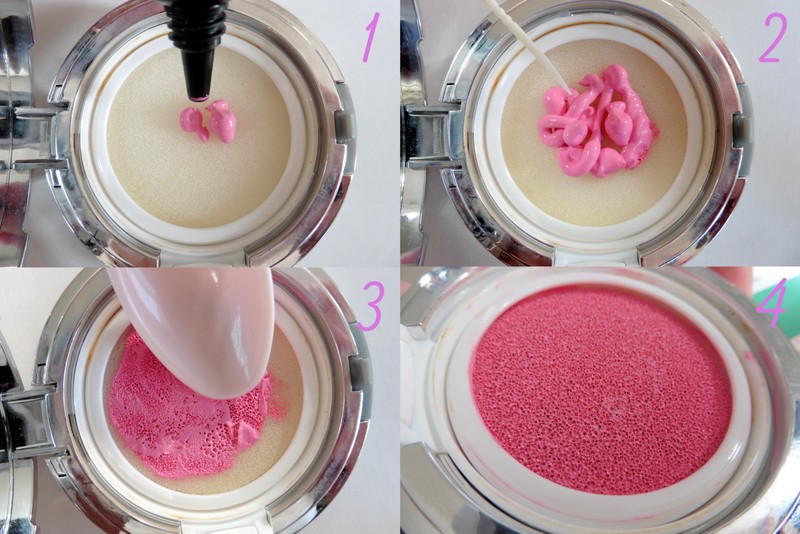
Directions:
- Apply liquid blush onto the top of the sponge.
- Keep applying until there’s enough to saturate the top. I squeezed out pretty much the whole tube. (Ignore the useless toothpick.)
- Use the back of the spoon or spatula to smooth the blush over the surface (like icing a cake), pressing it in until it’s absorbed by the sponge.
- Finished! Admire your new blusher.
 So purrty! ::Drools:: The cushion will look darker than the blush really is.
 If you’re familiar with DIY cushion compacts, you’ll notice that my directions deviate from the normal method of adding the liquid first and then pressing the sponge into the liquid. The reason for the deviation: the amount of blush is far less than what the sponge can hold.
Regular-size cushions hold 15g of product; the Heavy Rotation blush is only 7g. My concern was that if I used the normal method, there wouldn’t be enough blush to saturate the sponge to the top. If you have close to 15g of blush, then follow the normal method. FYI, the Etude House Lock’n Summer cushion blush is 5g and the IOPE one is 9g.

 Above, I swatched the cushion on my arm. (Done in direct sunlight, so it looks a little different than the original swatch done in indirect sunlight.)
It is still soooo pigmented. The amount on the puff above was enough for both cheeks, the swatch, and then some. I’ll stick with applying the lightest pat of blush with the top half of the puff and using the clean bottom half to blend.
I also ordered a cushion sample so that I could use its mini Rubycell puff for the blush. (On eBay, look for the AmorePacific samples in a blue tub. The Etude House set of 3 Magic Any Cushion samples also looks like it comes with mini puffs, but I can’t tell whether they’re Rubycell.) Of course, a Rubycell puff isn’t required, just preferred.
Update: Ten months later, this cushion is still going strong with no signs of going bad. It dried a little bit in that it’s not as liquidy as originally, but by no means is it dried out. I use it quite frequently. The mini Rubycell puff is tricky to hold because there’s no finger loop, but it’s still better than using the regular-size puff.
Here’s the cushion blush in action:
 Other makeup: Laneige BB Cushion in Light; Urban Decay Naked Palette; Chacott Quick Eyeliner; Nature Republic By Flower Triple Volume Tint in 03 Lilac.
 Other makeup: Innisfree Water Glow Cushion in No. 23; NYX Suede Collection Palette (provided for consideration by NYX); Laneige Serum Intense Lipstick in Love Me Pink.
Update: Check out Renee’s DIY cushion experience.
Update: This is my submission to the AB See Asian beauty link party for the theme KISS & MAKEUP.


So absolutely beautiful. -drools-
I now need this, but I’m going to have to buy a new case… and a liquid blush. I really wish they made mini ones too!
If there were mini ones, I’d be making my own cushion highlighters, too! I have so many liquid highlighter samples. I know you’ve been lemming the IOPE blushes, but now you could make a cushion blush that actually shows up.
Absolutely! So excited about this now. I was worried that it wouldn’t work out so well if I tried, but now I know it works! The blush looks absolutely beautiful on you 🙂
love this idea…
Oh it makes the application perfect! Sooo pretty! Yes, there needs to be DIY cushions of all sizes and pretty designs too! 😦
I’m also waiting for more companies to pump out cushion blushes. Just like with cushion foundations, maybe one day we’ll have a million cushion blushes to choose from.
Thank you for the clear and concise directions! I’ve been thinking about doing this for a while and your words were definitely helpful. This color is really pretty on you ngl.
Thanks! I hope you give it a try.
Wow, this looks so pretty! :O I want to try it so badly!
If you try it, I’d love to see how it turns out.
Yes I will let you know! 😀 It looks so interesting but it just looks so so natural and pretty on you!
This is such a good idea! This is a beautiful colour on you too. The whole cushion concept is new to the UK, I’ve only tried the Lancome cushion foundation very recently, but it makes transporting your foundation so easy (review on my blog if you’re interested.) Zoe xx
Just checked out your review. Interesting to hear what someone who’s new to cushions thinks about the concept. I also liked the quality photos and product close-ups you use throughout your blog.
Thank you, yes I like photography more than video reviews. 😄 I really like the cushion concept, it’s fantastic for travel but the coverage on this foundation is really sheer. Have you tried any other brands of cushion foundation?xx
Oh boy, HAVE I?! I sort of have a problem 🙂 I’ve tried 7 other cushions (all Korean brands, but a couple are sold in the States) and have liked them all. They are buildable to medium coverage and I agree with you that they diffuse imperfections but can’t cover them. Reviews for 6 of them are on this blog if you click on the “Cushion” tag at the bottom of any of my cushion posts.
Amazing! I’ll check it out thank you. 😄 Yeah I’m a bit of a foundation magpie at the moment too. I travel to China quite a bit with work so I might see if they have anything the next time I go.xx
Great idea ! Lovve the blush on you by the way ! It looks pretty good, now that I’m thinking about it, this could work out with a liquid highlighter as well ! Love my liquid highlighter but it takes so much more time to apply than powder that I tend to neglect it
Yes! Terrific idea. Especially since liquid highlighters really need to be patted on lightly to avoid disturbing foundation.
What a great idea. I never know what to do with overly pigmented products like this but you’ve really made it work – looks great on you.
Thank you! Hope you’ll give it a try.
Such a great idea! would wanna try this if I have a chance 🙂
I wonder if this will work with a more liquidy blush? I’m thinking of trying this with the Tonymoly lip and cheek tint.
How interesting. I have no idea and would be curious to hear how it turns out if you end up doing it. The liquid tints might dry up faster since they probably lack emollients. Then again, some might have thought that my creamy blush should have dried up, but it’s still useable and blendable after all this time.
I might try two versions and try adding something thicker to the second one haha.
This is such a cute idea! But I know I would screw it up, I’m just that way inclined haha. I love the idea of cushion blushes but in reality I’ve never got on particularly well with them. Do you prefer them to powder blushes?
I still love powder blushes more! But when I’m wearing a glowy or satiny cushion foundation that I don’t want to powder down, blush in cushion (or any non-powder) form is all that will work. Powder blush just sticks and goes patchy.
I love this tutorial! It’s so deceptively simple and affordable as well. Now I just need to get my hands on some liquid blush and cushion refills.
Sophie | MapleTreeBlog
Awesome DIY! I love creative stuff like this, and even better with the 10 month update =).
Wow, the colour is gorgeous! It does look quite pigmented as well.
On a side note, also love the lipstick shade you’re wearing too!